By using Gzip, webmasters can easily speed up websites without paying more for a bandwidth upgrade. Modern browsers supports gzip compressed content and are capable of uncompressing gzip data into plain text. So what is Gzip and how can you enable GZIP for you wordpress blog on Apache hosting?
What is Gzip?
Gzip is short for GNU zip. It is a compression utility designed to be a replacement for compress. Jean-loup Gailly and Mark Adler created it for UNIX. The .gz files we found in Linux is an GZIP file. Gzip has become a very popular file compression format. Gzip will help you save traffic about 60% for text file.
Enable Gzip Compression for Apache (VPS users)
Add Gzip module
vi /etc/httpd/conf/httpd.conf
Seclect LoadModule (/LoadModule)
Add “LoadModule deflate_module modules/mod_deflate.so” into it.
Add configuration into “.htaccess” file ( Apache 2.x users )
Use vim to edit .htaccess file:
vi .htaccess
Add the configuration command:
<IfModule mod_deflate.c>
 DeflateCompressionLevel 9
 SetOutputFilter DEFLATE
 AddOutputFilterByType DEFLATE text/html text/plain text/xml application/x-javascript application/x-httpd-php
 AddOutputFilter DEFLATE js css
 </IfModule>
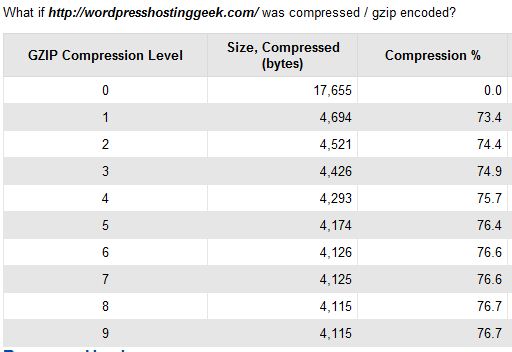
You can edit Compression Level as you like. Bellow is a example:

Restart apache to enable Gzip
service httpd start
Enable Gzip Compression for Shared hosting
For shared host users, while you also run on Apache, you are not able to use SSH to connect your hosting. At this time, you need to login with your FTP client and find the .htaccess file. The .htaccess file is often place under the root folder.
Then you can add configuration into “.htaccess” file. The configuration is the same to it used for VPS.
Gzip test tool:
The following 2 tools can help you check whether Gzip is enabled for you website.
http://www.gidnetwork.com/tools/gzip-test.php
http://www.whatsmyip.org/http-compression-test/
You can refer to the How to Configure Your Website Using Htaccess article to get the basic knowledge about the htaccess configuration.